Creating a webdesign
explain webdesign basics (what is it, how to use it)
Creating a module
WebHare uses so-called "modules" to group code and data together in logical groups. These modules are stored in the data folder, in the subfolder "installedmodules". This folder can contain module folders, and module group folders (to logically group modules together).
To create a new module, use the following command:
docker exec webhare wh module create [modulegroupname/]<modulename>
Create and initialize the webdesign
To create a new webdesign in a module, use the following command
docker exec webhare wh module createwebdesign <modulename>:<webdesignname> <domainname>
domainname is used to create the namespace used inside the webdesign.
If domainname is “example.com” the first part of the namespace used in the webdesign will become: http://example.com/
Creating the website
Creating a website that uses the webdesign is done in the Publisher application.
For more about the Publisher, visit the user manal.
- Start the WebHare publisher from the Start Menu
- Select the folder (or create a new folder and select it) where you want your website.
- Select in ‘Menu’ option File > New > Website…
- The “New site” dialog is opened. You can now set:
- name;
- output URL;
- subfolder: for development purposes a subfolder is usually used to allow multiple sites on one webserver URL.
- In the tab ‘Design’ select your previously created webdesign.
- Press “OK” to confirm settings.
Creating content in your website
To create content, an RTD document should be added.
- In the Publisher application, select your website in the tree on the left.
- Click "New file”.
- Select "Rich text document" and press "OK".
- You can now select a name for your file.
- Make sure "Publish this file” is selected.
- Press "OK”
The file is added to the website, and can be edited in the RTD document editor. For more about the editor, see the user manual.
- Double-click on the new file. This will open the document editor.
- Use the editor to add some content to this file.
- Press "Publish”, then answer "Yes".
- Close the editor by choosing "Exit” in the menu.
The content you have added is now displayed in the preview, and can be visited by selecting the file and clicking the “View” button. The page will then be opened in a new tab or window.
Setting debug mode
When you have a website with a published page you can enable Website Debug settings to obtain extra information for development and debugging.
- Select a published file within the website.
- Choose “Tools” -> Set Website debug settings” from the Publisher menu.
- Make sure “Enable output debug mode” is checked.
- Click the “Save” button.
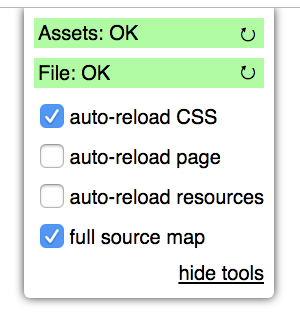
The published version of the file is displayed. On the page a debug tool block is displayed. When you click it, debugging information and some more options are shown:
